Different setups

The default local database

The default setup depends on a single workstation or server. The scanning is done from a single machine and the information is stored in a local database file. The disadvantage of this setup is that the scanned information cannot be shared and that the workstation or server will have to scan all the remote file systems, which has the overhead of reading remote NTFS permissions over the network:

Diagram of the setup using the default database file

The performance depends a lot on the network setup and hardware. Scanning local files using a local database scans about 25,000 files per minute and takes 1 MB database storage per 1000 files or directories. When scanning a NAS or using a remote database, much of the performance depends on the network environment.

Share info with a central database

The second setup has a shared (external) database, which means that other team members / workstations can use the scanned information from the database to create overviews. Use a central database server to scan NTFS permissions and to share network data, filter definitions and reports The application supports Oracle, MSSQL, DB2, MySQL, PostgreSQL, H2 and Derby out of the box. User reports, policies and filter sets are stored in the database, so when you use a central database you can share that information between all the clients/workstations. Note that each workstation requires a license, Permission Analyzer is licensed on “per-installation” basis. The Basic and Standard Edition don’t support the use of an external database.

Diagram of the setup using a central remote database like MSSQL Server

Scan each file server locally using Scan Agents

The third setup may prevent the reading of remote permissions over the network and makes it possible to scan the file systems simultaneously. Instead of scanning a remote file system from a workstation, every file server will scan its own local permissions and submits the information to a central database. Install Permission Analyzer on each file server and scan files locally while using a central database server to share information. Reading local permissions is a lot faster and the file servers can scan their permissions simultaneously. The file servers only require a (cheaper) Scan Agent license, which doesn’t support reporting, but only scanning the network. A Scan Agent is the same application installation (and download from the website), but it is activated with a Scan Agent license. This will only activate the scanning features of the application.

Diagram of the setup using scan agents to scan file server locally

Every scan agent can be scheduled using Windows Scheduled Tasks in combination with the application parameter “-scan”. A Scan Agent stores the status messages in the central database, which is also the way in which to communicate with an agent. You can view the scan results of every agent in a centralized view of either one of the scan agents or your workstation:

View remote logs

View remote logs dialog

Using PowerShell scripts

PowerShell is a native Microsoft scripting solution, which allows you to scan the ACL’s of directories and files. PowerShell scripts are executed on the remote server (if necessary) and the result is saved locally. So instead of scanning the network using Permission Analyzer, you can use a PowerShell script to export all the ACL information to a text file which can be imported into Permission Analyzer. Execute a command-line and type “powershell”, you should see a command prompt that starts with “PS”. Copy and paste one of the following scripts to the command-line to export permissions.


PowerShell script to export the ACL of all (sub)directories and files to a text file:
Get-ChildItem "C:\MyFolder" -Recurse | Sort-Object FullName | %{
$Path = $_.FullName
$IsDirectory = $_.PsIsContainer
(Get-Acl $Path) | Select-Object `
@{n='Path';e={ "$Path, d=$IsDirectory" }},
@{n='Access';e={ [String]::Join("`n", $( $_.Access | %{
"$($_.IdentityReference), $($_.AccessControlType), $($_.IsInherited), $($_.InheritanceFlags), $($_.PropagationFlags), $($_.FileSystemRights)" })) }}
} | Format-list | Out-File -FilePath C:\temp\permission_export.txt -Encoding UTF8


PowerShell script to exclude files (and only export directories):
Get-ChildItem "C:\MyFolder" -Recurse | Sort-Object FullName | ?{ $_.PsIsContainer } | %{
$Path = $_.FullName
$IsDirectory = $_.PsIsContainer
(Get-Acl $Path) | Select-Object `
@{n='Path';e={ "$Path, d=$IsDirectory" }},
@{n='Access';e={ [String]::Join("`n", $( $_.Access | %{
"$($_.IdentityReference), $($_.AccessControlType), $($_.IsInherited), $($_.InheritanceFlags), $($_.PropagationFlags), $($_.FileSystemRights)" })) }}
} | Format-list | Out-File -FilePath C:\temp\permission_export.txt -Encoding UTF8


PowerShell script to exclude inherited permissions:
Get-ChildItem "C:\MyFolder" -Recurse | Sort-Object FullName | ?{ $_.PsIsContainer } | %{
$Path = $_.FullName
$IsDirectory = $_.PsIsContainer
(Get-Acl $Path) | Select-Object `
@{n='Path';e={ "$Path, d=$IsDirectory" }},
@{n='Access';e={ [String]::Join("`n", $( $_.Access | %{
"$($_.IdentityReference), $($_.AccessControlType), $($_.IsInherited), $($_.InheritanceFlags), $($_.PropagationFlags), $($_.FileSystemRights)" })) }}
} | Format-list | Out-File -FilePath C:\temp\permission_export.txt -Encoding UTF8


The resulting text file has the following format:
Path : <path>
Access : <member>, <Allow/Deny>, <inherited ACE>, <inheritance flags>, <propagation flags>, <permissions>, <member>, <Allow/Deny>, <inherited ACE>, <inheritance flags>, <propagation flags>, <permissions>


Example output:
Path : \\server01\Data\Projects\Finance, d=True
Access : YOURDOMAIN\Domain Admins, Allow, True, None, None, FullControl, Synchronize
YOURDOMAIN\pbrandon, Allow, True, ContainerInherit, InheritOnly, ReadAndExecute, Synchronize
YOURDOMAIN\gwatson, Allow, True, None, None, FullControl, Synchronize
YOURDOMAIN\Project Office, Allow, True, ContainerInherit, ObjectInherit, InheritOnly, Modify, Synchronize
YOURDOMAIN\Finance Auditors, Allow, True, None, None, FullControl, Synchronize


Importing the PowerShell results

The text file that has been created can be imported into Permission Analyzer:

Dialog to import a PowerShell script

Dialog to select a PowerShell script

You can now scan the content of the text file the same you would scan a directory or share. Use the same command line options (“-scan”) to scan the text file periodically using Windows Scheduled Tasks. Note that Permission Analyzer scans ACL’s more than twice as fast as the provided PowerShell scripts.

Tip: Zip the text file to save storage and import the zip file directly into Permission Analyzer, the application will recognize the zip extension.

Permission Analyzer also supports files exported from a EMC Isilon NAS. See the Help button in the import dialog for more information.

Example use-case

More than ten years ago, Permission Analyzer started as an application to reveal the NTFS rights per user or group. Now, the application has been completely rebuilt to version 2, in order to better fulfill information requirements. Permission Analyzer was rebuilt with the focus on performance and large amounts of data. The directory information and user information is therefore not all loaded into memory and it does not scan the network for every search, but it uses a database to gather all the information together and to apply filters. It’s standard to use an embedded database (H2), but out-of-box the application also supports MSSQL Server, Oracle, MySQL, DB2, PostgreSQL and Derby.


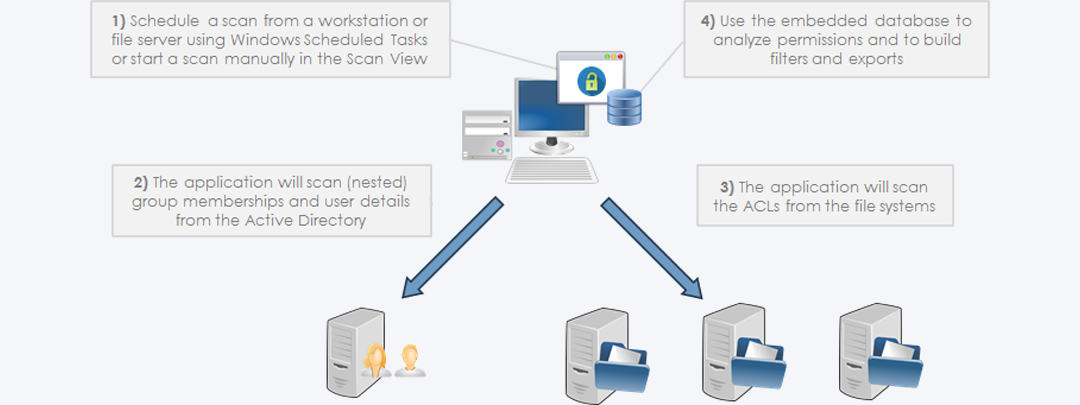
Scanning the network

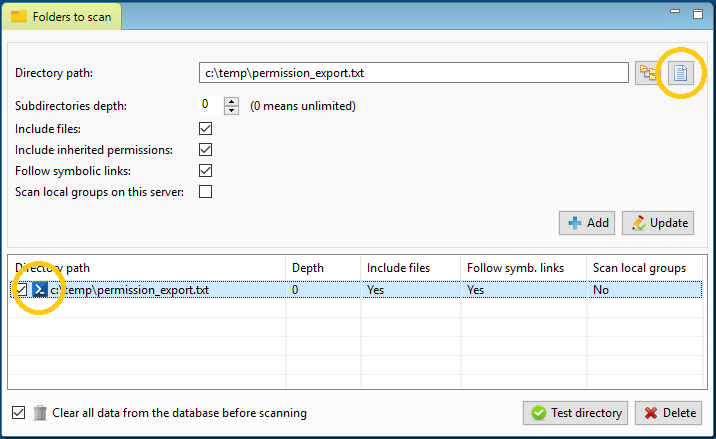
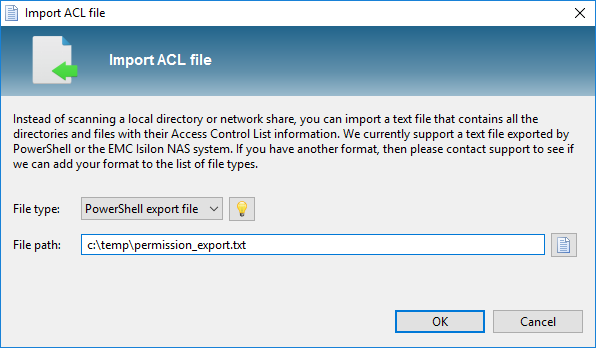
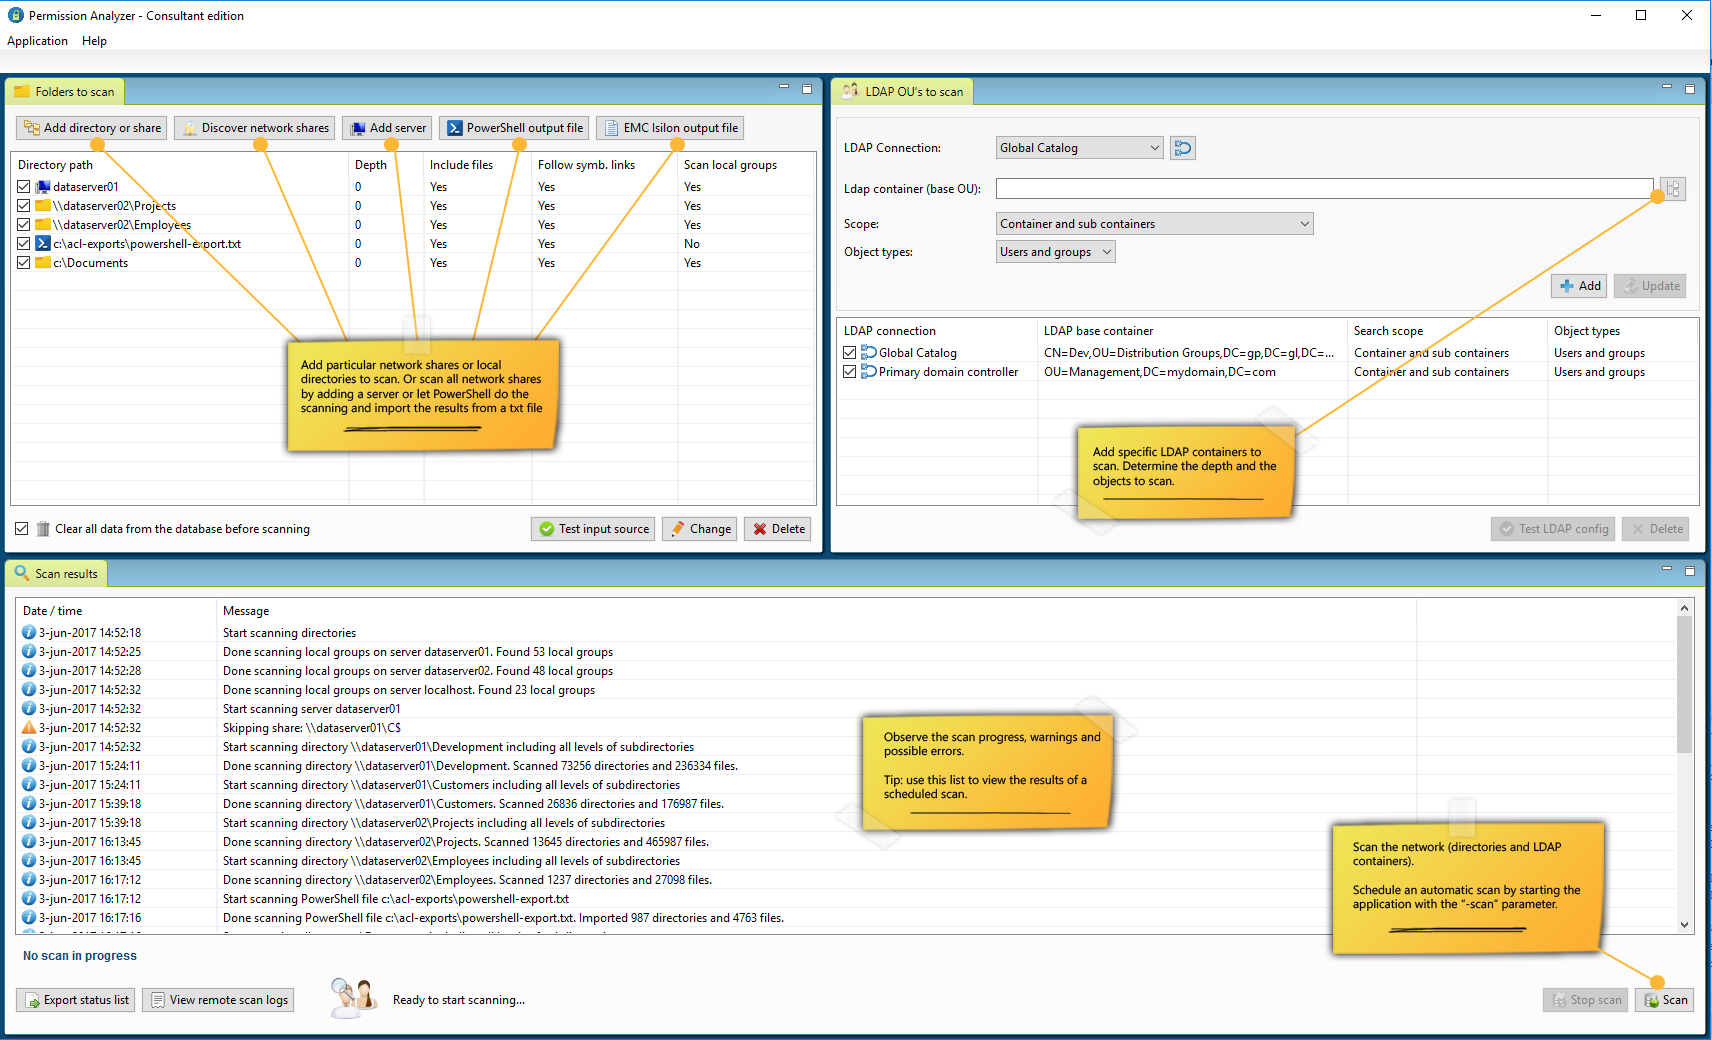
The application provides two ‘views’ from the menu, the Scan View and the Report View. In the Scan View the scan is configured by selecting the desired directories and OU’s from the Active Directory. The directories can be added as network share, local directory, simply a server name (a search for network shares will automatically happen), or a text/zip file generated by a Powershell script included or EMC Isilon export from a NetApp filer. Incidentally, a Scan Agents can also be used that run locally on a file server and store the scan results in a central database. The Active Directory OU’s are used to scan for group memberships. A scan can also be started automatically with various command-line parameters, which periodically refreshes the data.

Screenshot of scanning the network


Creating reports

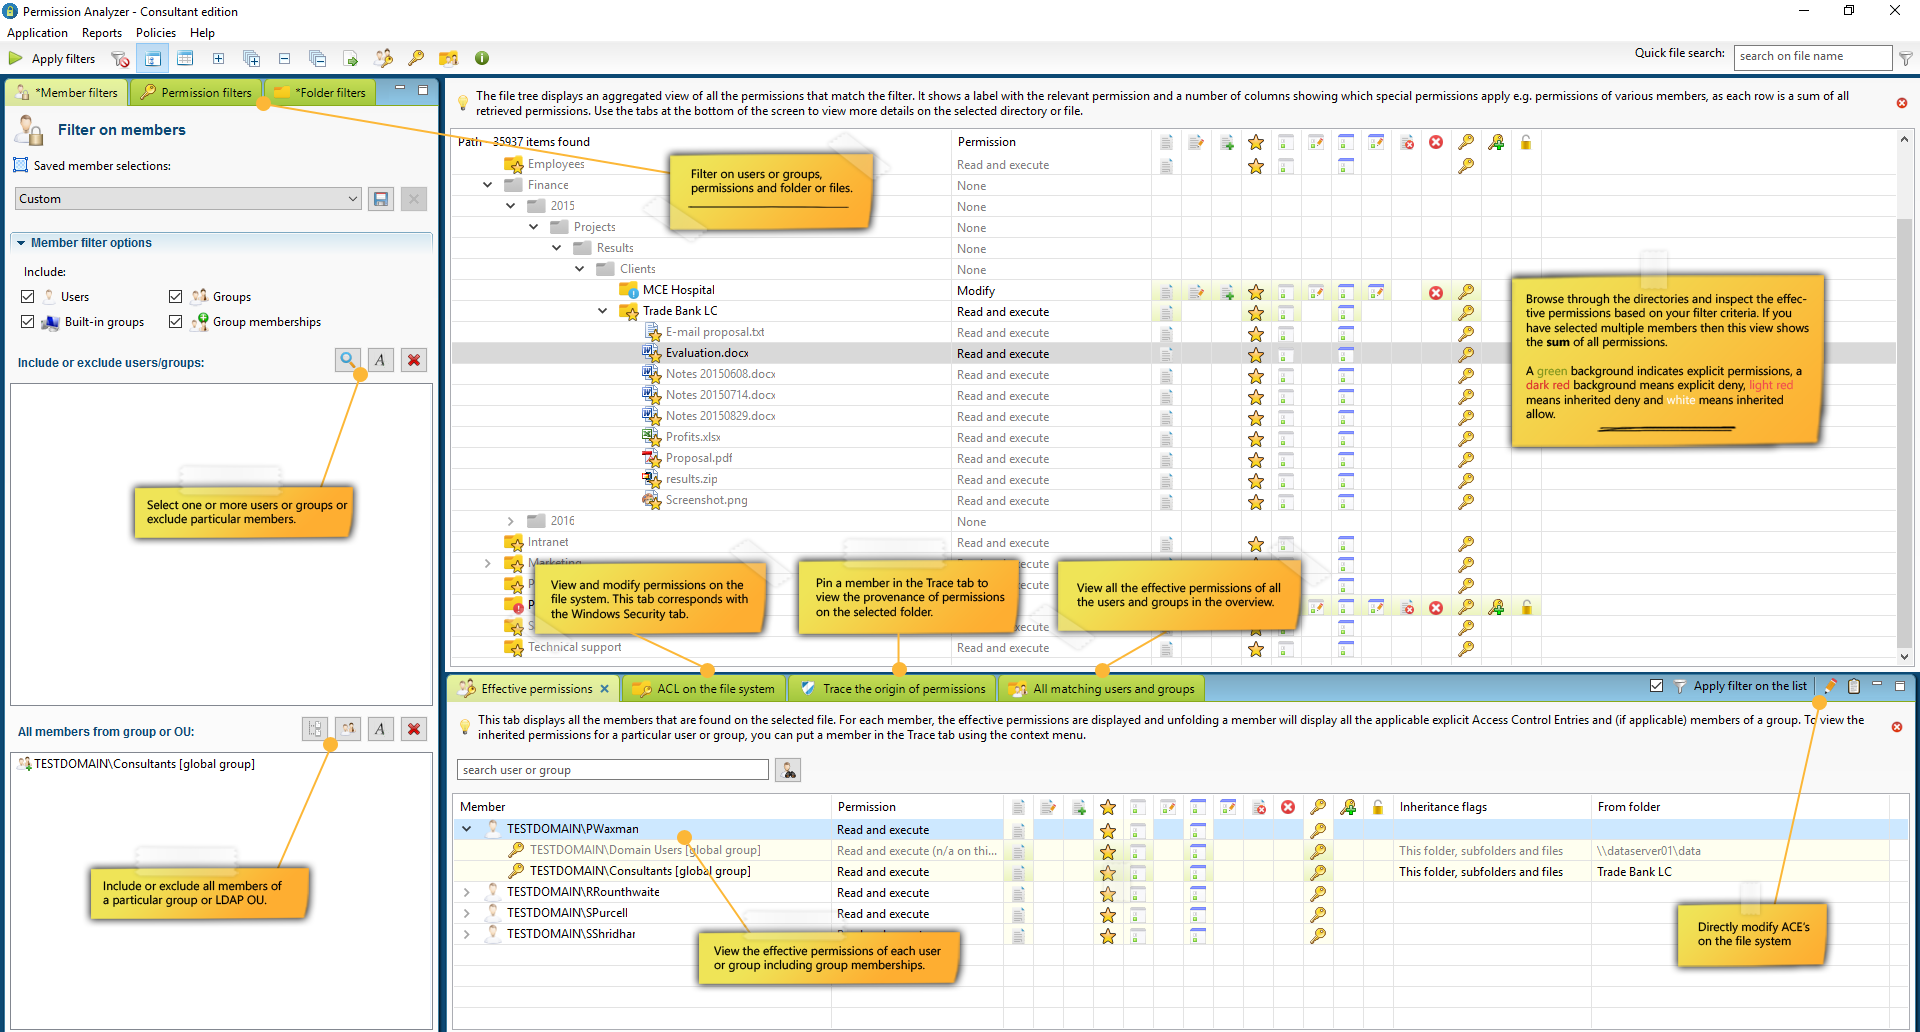
After the scan is complete the database can be used to make overviews. The Report View of the application displays the initial folder tree containing a summation of the rights found per directory or file. The folder icon indicates what rights are found and the columns next to a directory show the special rights. Without applying filters, the permission will mainly be set to “Full Control” with all the special rights, but after applying filters on a user or group, the unwanted rights can be viewed at a glance. In order to not clutter the folder tree the users are not instantly displayed in the folder tree, but rather across in four tabs under the folder tree:

  • Effective permissions: displays the effective rights of all users and groups in the selected folder that match the filter criteria. Each user or group can be folded out to see where the rights originate from.
  • ACL on the file system: shows the rights (Access Control Entries) as they appear on the file system. This corresponds with the Security tab in Windows Explorer and includes the possibility to adjust rights from within the application.
  • Trace the origin of permissions: provides the ability to create a user or group to pin down through which group memberships and parent folders the rights have been obtained.
  • All matching users and groups: the previous tabs display information for the selected directory. This tab displays all unique users and groups that are found in the overview. Each user or group can be folded out to see where the rights are found and through which group.
Screenshot of viewing NTFS permissions and search results

Through these four angles we can easily get answers to different information requirements. We can instantly view effective rights on all directories, we see per directory and user where the rights come from and we can filter out all the users of a particular group without losing the relationship between the rights and users. The latter helps us with the information requirement (“What are the right for all users of a specific group and where are the exceptions?“). Finally, we want to know which users or groups are involved in the unwanted rights within the search results. By including multiple users/groups as a filter, or a filter of the “All members from group” type, in one bulk check an overview is created for a large group of users including nested group memberships. With the "Effective Permissions" and "All matching users and groups" tabs, we can subsequently zoom in on individual users.

The last information requirements is to run checks to keep the access rights consistent. Instead of notifying system administrators for each change, Permission Analyzer offers another solution. A set of filters can be stored as Policy in order to periodically check for unwanted rights. If search results are found on a Policy, the system administrator can be notified by email, with an HTML report of the rights found as an attachment. Also, the list of Policies with their status is available within the application. Loading of a Policy gives the possibility to zoom in on the results and thus solve the cause.


Example of an audit policy

We make a policy in which it is stated: “Nobody from the group Freelancers can edit project data”

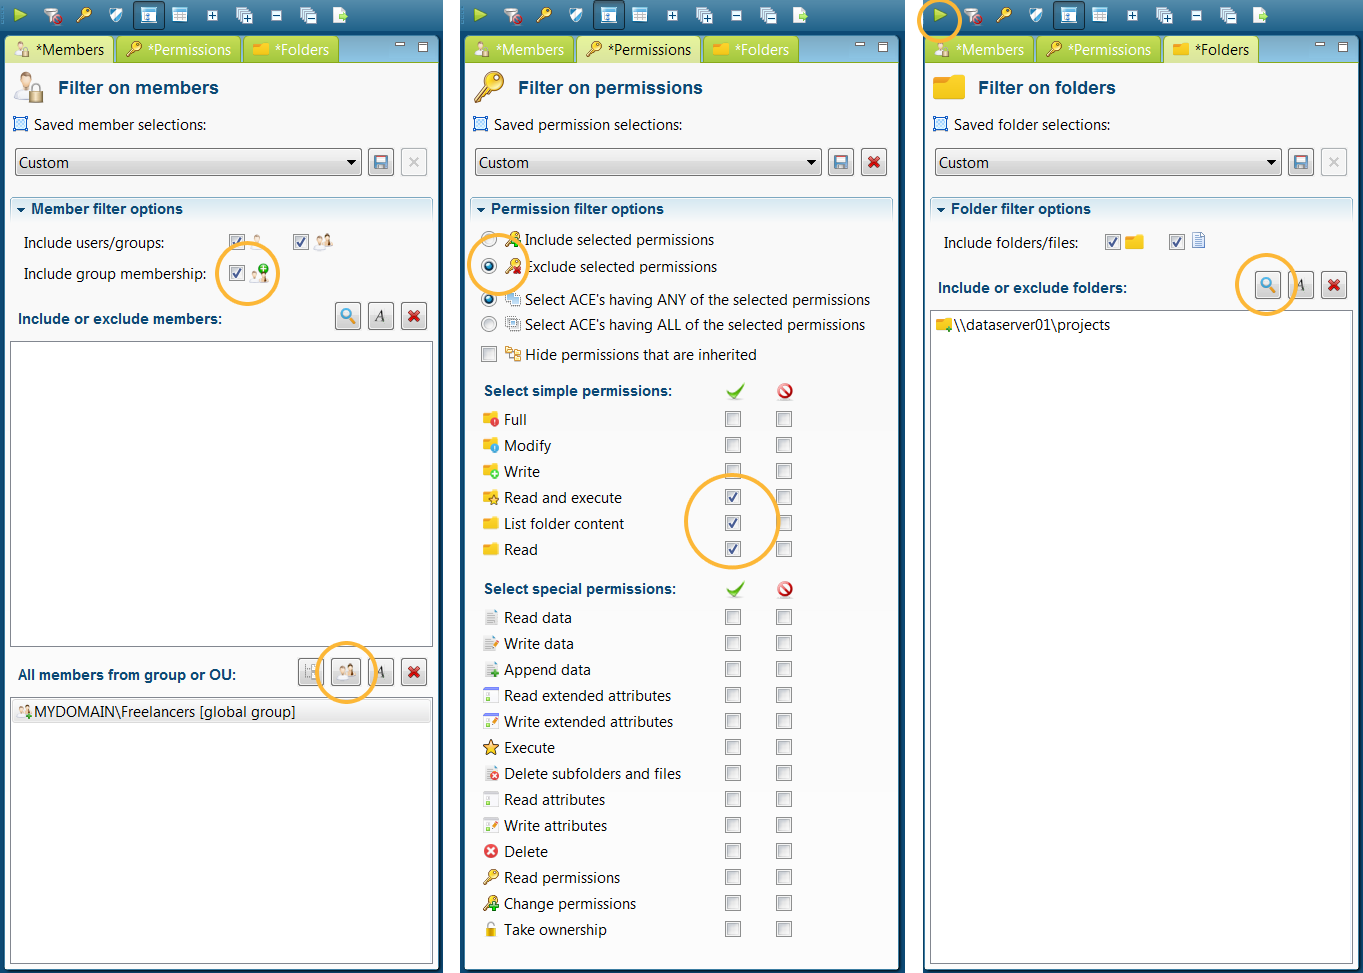
We want to create a report in which we get to see the unwanted rights so that we can save the filters as Policy. We add a member filter of the type “All members from group” and we select the group Freelancers. Then we add additional filters to the rights (we want to allow read access), and we report on the scopes folder \\dataserver01\projects:

Saving your filter as security audit policy

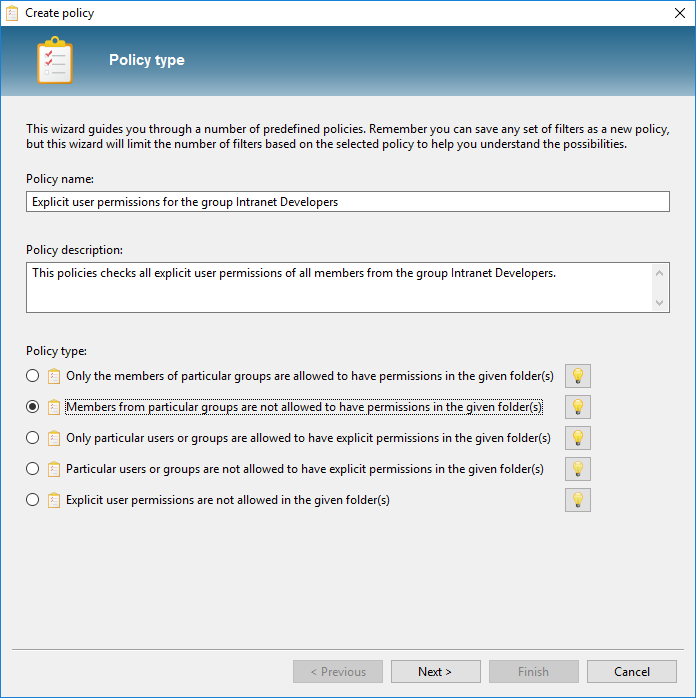
Tip: Use the Policy Wizard to get acquainted with the various filter options:

Creating a new policy using the wizard dialog

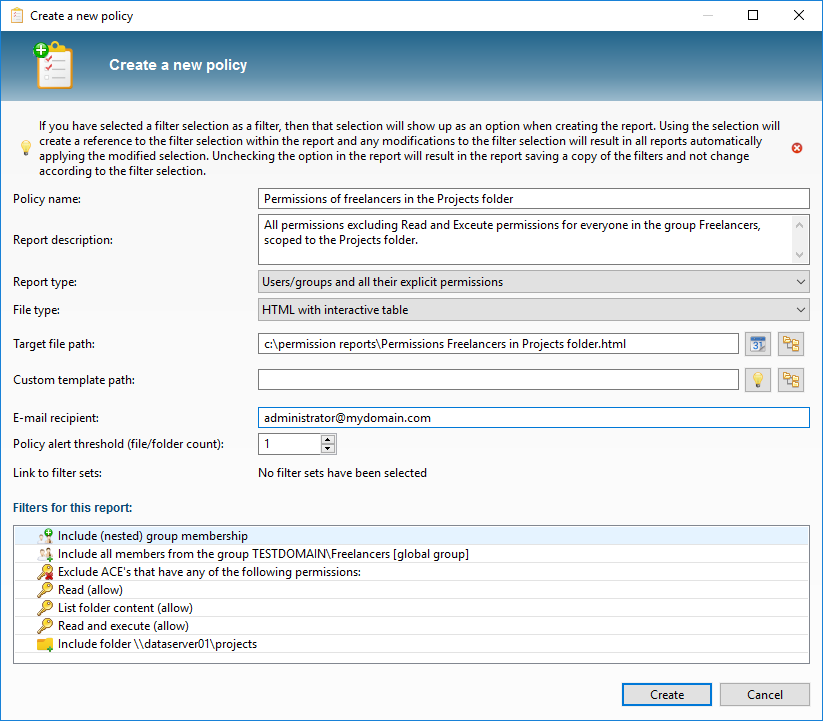
The listing now shouldn’t display any search results, which means that no unwanted rights have been found. We now store the filters as Policy:

Dialog with audit policy details

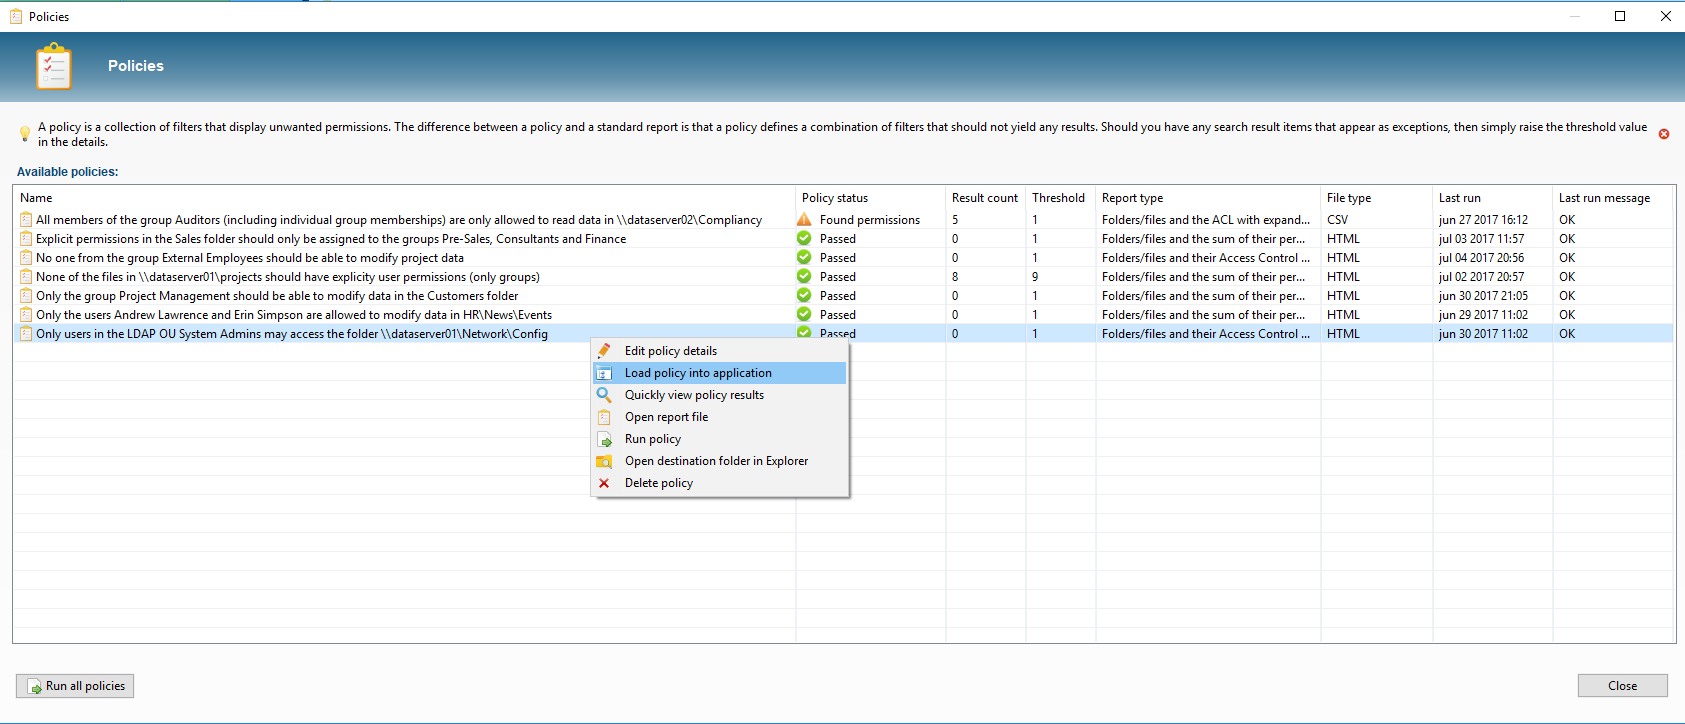
By regularly running the policies via the parameters -scan and -allPolicies, we can periodically check the rights for consistency, without having to check each change in the folder structure manually. In the overview of Policies we can see the status of our rules at a glance and we can zoom in on the unwanted rights by loading a policy in the application:

Dialog with all your policy and their compliancy status

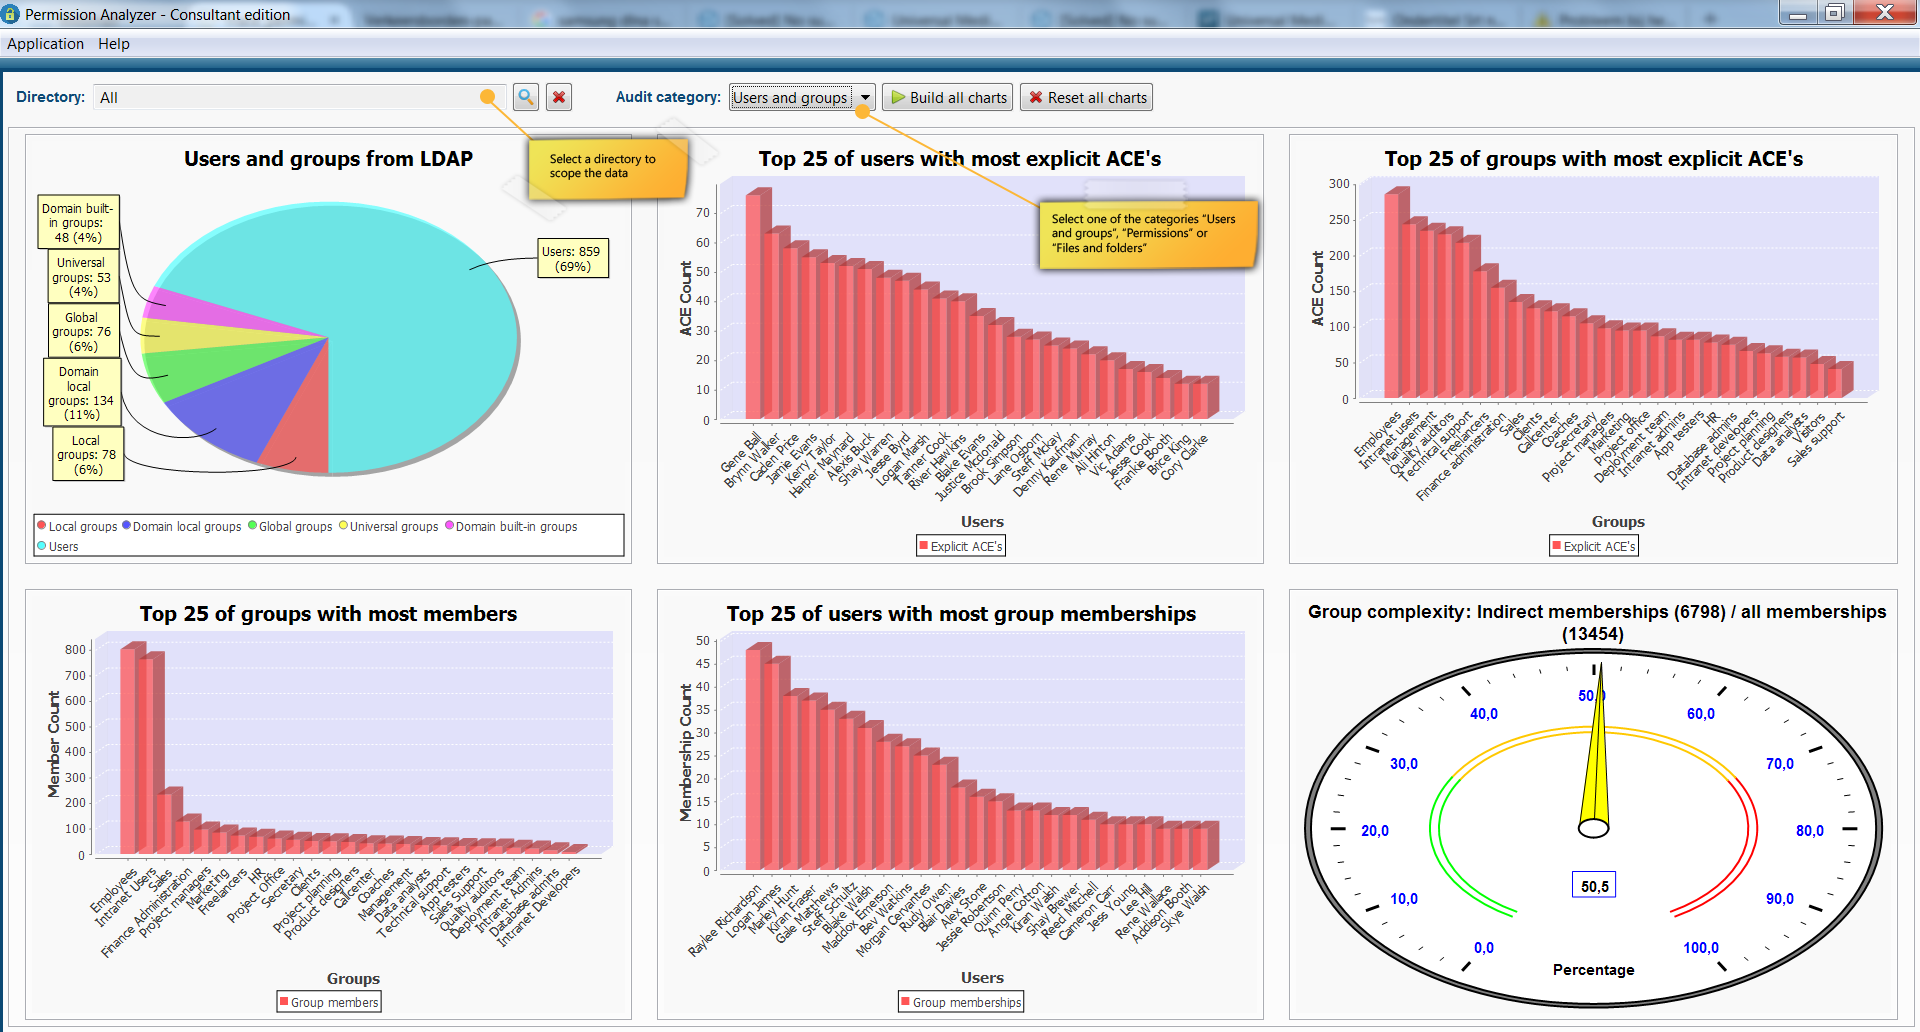
In addition to regularly running policies we can immediately discover a number of improvements for the Data Access Governance via the Audit Permission Analyzer’s dashboard. This dashboard shows 18 different charts including a top 25 of users who have the most explicit rights (rights that may have to be regulated through a group membership), a top 25 of users with the most group memberships, the ratio between direct and indirect group membership, directories with the most explicit rights and much more. Many of these statistics instantly detect where the possible risks are if someone manages to get unauthorized access to the system.

Screenshot of the Audit dashboard with security statistics